
Symptoms of 100% Disk Usage in Windows 10
Windows 10 users who experience problems such as slow latency may search in their Task Manager for instructions. Task Manager provides you with a wide range of information about the processes that are currently using the device's disk on your device

One of the metrics that you can monitor using Task Manager is disk usage for your computer. If you see 100% disk usage, your usage of your device has reached its limit and your system performance will deteriorate. You need to take some corrective action.
Many users who recently upgraded to Windows 10 complained that their computers were running slowly and reported to Task Manager about 100% disk usage.
11 Method to Fix 100% Disk Usage on Windows
Here are 10 methods you can use to try to resolve a high disk usage issue on your Windows 10 system. Some may take longer than usual because of the increased compression and usage that your hard drive already has.
- Restart your system
- Windows Update
- Check for malware
- Disable windows search
- Stop the Super fetch service
- Change power options from balanced performance to high performance
- Temporarily turn off the antivirus program
- Reset Virtual Memory in Windows 10
- Run Disk Check
- Change settings in Google Chrome and Skype
- Change File Explorer Options
Method 1: Restart your system
Learn from experience that restarting your device can solve all kinds of problems. The problem of disk usage Windows 10 100% is no exception. While this pathway may not help you figure out the root cause of the problem, this may be enough if it fades.
 |
| Windows 10 reboot |
Method 2: Windows Update
Installing the latest updates often resolves ambiguous issues in your Windows 10 system. Check if you're up to date by going to the "Update and Security" section of the Windows Settings app.
 |
| Windows update in Win 10 |
Method 3: Check for malware
Your computer may be infected with malware that increases your disk usage. If you have an antivirus program running in the background, the problem should have been detected. Nothing is perfect, so force your antivirus package to scan your hard drive for possible infection. This can be a time-consuming process because your disk is already experiencing high usage, but it may be necessary to identify and remove malware.
Method 4: Disable Windows Search
A known error in Windows 8 and 10 may cause a search loop that could be the cause of your use of the high disk. To temporarily stop the Windows Search attachment and see if it improves your disk problem, open an administrator prompt and enter the command: net.exe Stops "Windows search". This will turn off Windows Search until the next time Windows restarts.
 |
| Stop Windows search |
If it turns out that Windows Search was 100% responsible for using the Windows 10 disc, you can permanently disable it by following this procedure:
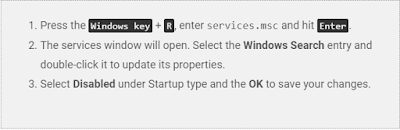
Press the Windows key + R, enter services.msc and press Enter.
The Services window will open. Select the Windows Search entry and double-click it to update its properties.
Select Disabled under Startup type, and then click OK to save the changes.
Method 5: Stop the Superfetch service
Another Windows 10 feature that can cause problems is the Windows Superfetch service. You can temporarily disable this service in a similar way to Windows Search by using the command: net.exe stop superfetch.
 |
| 100% Disk Usage on Win 10 |
Method 6: Change the power options from balanced performance to high performance
This change in power settings seems to have worked with a number of users who have tried 100% disk usage on Windows 10.Use this procedure:
 |
| Use Windows 10 Power Disk |
Select the High-performance option from the drop-down box and make sure all plan settings are set to their default settings.
Method 7: Temporarily turn off the antivirus program
Another step you should take when checking the cause of a 100% disk usage problem in Windows 10 is to temporarily turn off your antivirus software. See if this improves your disk usage. If so, you may want to change your antivirus packages. Even Windows Defender may cause problems by increasing I / O and network usage, which can lead to higher disk usage.
Method 8: Reset the virtual memory in Windows 10
Virtual memory treats your disk as if it were RAM and uses it to swap temporary files when it runs out of physical RAM. Errors in pagefile.sys can cause 100% disk usage on a Windows 10 machine. The remedy for this problem is to reset the virtual memory settings.
Follow these steps to reset virtual memory
1) In System Properties on your computer, you must click Advanced System Settings. Use high disk Win 10


3) Select the Advanced tab and click the Change button. 
4) Make sure the box labeled "Manage paging file size automatically" is checked.

5) You can also choose "No paging file", press "OK" and restart. This will prevent virtual memory usage and may improve the performance of your system disk

You can see the heck disk if there are any physical problems in your hard drive. High disk usage usually indicates a problem or logical application that drives disk usage, but it is worth your time to rule out any physical damage. Run a disk scan and note its results.
Method 10: Change settings in Google Chrome and Skype
Some users have reported that making these changes to Google Chrome and Skype settings can have a beneficial effect on disk usage.
For Chrome, make this change:

Settings -> Show advanced settings.
Under the Privacy section, deselect the 'Use prediction service to load pages more quickly' option.
You should also try disabling Flash in Google Chrome.

To update your Skype settings, use this procedure:
To start Skype for Windows 10, select the Start menu from the bottom right of the screen. In the list of available applications, scroll down to Skype for Windows 10 and click it to open it.
Select the Security tab and click the Edit option.
In the "Groups or usernames" list, select "All app packages." Select the Write option to select Allow, which allows Skype to write to disk.
Press OK.
If these methods do not resolve your issue with a 100% disk on a Windows 10 computer, you may want to look for a hard drive replacement. The last thing to try is to disable any automatic defragments that are running because they can cause problems. In general, your hard drive should not be 100%, so if so, there is some reason for the situation. You need to fix the problem or risk a slow-moving computer.
Method 11: Change File Explorer Options
1) Open Windows 10 File Explorer, and then navigate to "View" and click "Options".
2). Switch to the "Search" tab and UNCHECK these two options- "Include compressed files (ZIP, CAB…)"
- "Always search file names and contents (this might take several minutes)"

3) Click “Apply” and then “OK”.
Some Other Fixes You May Have a Try
Since you are here, take a look at the suggestions put forward by users who have successfully overcome the 100% disk utilization problem.
Remove Adobe Creative Cloud and Photoshop CC. You may have to allow their update before you can uninstall.
Uninstall disk driver and reboot.
Disable "Intel Rapid Start Technology" in BIOS.
But if all of these fixes do not help. Continue reading Fix 11 and Fix 12.
Second Move: Reinstall Windows 10
Step 1. Download Windows 10 media creation tool to create a Windows 10 installation media.Step 2. Connect the installation media you just prepared and follow the installation process to complete. When you see "Where do you want to install Windows", select each partition to do the deletion and then choose the unallocated space to do a clean install.

Tags
Disk Usage
This is very good technical information for learner.
ReplyDelete