
Failover Cluster
Windows Server Failover Clustering (WSFC) is a feature of the Windows Server platform for improving the high availability (HA) of applications and services. ... In order for a failover cluster to work, each server's hardware specifications must be the same and the servers must share storage.
 |
Type of Server Cluster
There are three types of server clusters
1) Single quorum device cluster is a multi-server configuration with a quorum stored on a disk attached to a storage bus (SCSI or Fibre), shared among all the nodes. The Single shared quorum cluster model has two or more nodes and all are connected to a shared storage device.
2) Majority node set cluster Node and file share majority
The cluster nodes and file share participate in the clustering voting process. If more than half of the nodes are available. If the cluster contains an even number of nodes. This is typically used when a cluster spans multiple sites
3) Local quorum cluster A Single local quorum is a single-server configuration with a quorum stored on the server's local disk. The single-node cluster can use the local quorum resource which is kept on the local hard disk storage. The local quorum resource is used only for cluster application development and testing of cluster applications
How Creating a Windows Server 2012 Failover Cluster
Creating a Failover Cluster for Windows 2012 is not much different from 2008 R2, but I created this directory anyway for those of you new to Server 2012. To create this cluster, I will use HP MSA 2040 SAN, We will create an active / passive failover system. This means that we have one node that keeps applications / services for the end user, and the other in standby mode. If the other active node is crushed, the inactive node is responsible. With Windows server 2012, you get 64 nodes in the cluster, compared to Windows 2008 R2 server where you can have only 16 nodes. The following is the configuration you need in order to complete this; of course, both nodes are related to the Windows domain. Heartbeat and iSCSI networks must be on separate switches or VLANs, due to high traffic.
Node1
|
Node2
|
| Network 1 (LAN) – 172.16.200.150/24 | Network 1 (LAN) – 172.16.200.152/24 |
| Network 2 (iSCSI) – 172.16.200.203/24 | Network 2 (iSCSI) – 172.16.200.204/24 |
| Network 3 (Heartbeat) – 10.0.0.1/24 | Network 3 (Heartbeat) – 10.0.0.2/24 |
After you assigned the IP addresses to every network adapter verify the adapters order in the Advanced Settings Connections window. Go to Network Connections click Advanced > Advanced Settings and make sure that your LAN connection is the first one. If not, select it and press the up arrow to move the connection to the top of the list.
First of all you will implement the core components for failover clustering before going to install and validate the cluster, and then you will create the failover cluster.”
1) For this configuration i will be using my CLUSTER_1 member server of blog2india.com, on CLUSTER_1, open Server Manager, click Tools, and then click the iSCSI Initiator…

2) In the Microsoft iSCSI interface, just click Yes…

3) on the iSCSI initiator Properties interface, click the Discovery tab and then click Discover Portal…
** Internet SCSI (iSCSI) initiator –> to established a connection with an iSCSI target (SAN HP MSA2040)
4) In the IP address or DNS name box, type 172.16.200.201, and then click OK…
172.16.200.201 – HP MSA 2040 SAN iSCSI interface IP

5) Click on Favorite Targets here you can see Storage(SAN) information then click Ok

Below you can see the LUN map through with both cluster Servers

This series will be written in a very basic, step-by-step style that walks you through the process in an ordered list with basic instructions and plenty of screen shots to help illustrate the procedure where needed. So let’s begin at the beginning…
1) Add the Failover Clustering Feature on all of the servers you want to add to the cluster
2) Open the Server Manager Dashboard (this 1st step will need to be completed on both PRIMARY and SECONDARY)
3) Click on Add roles and features

4) just showing the information please continues click Next

5) Choose Role-based or feature-based installation

6) Select a Server from the server pool then click Next

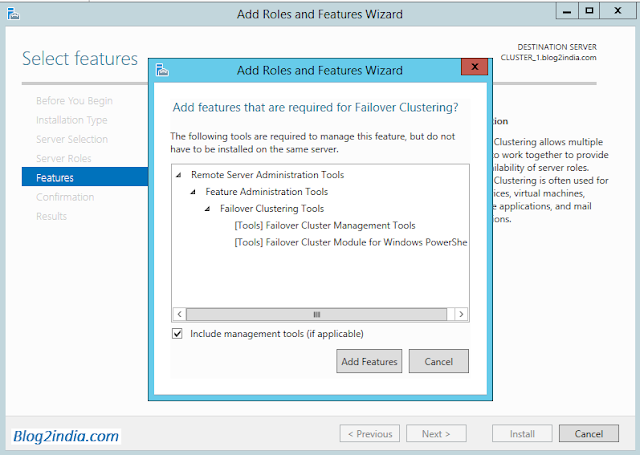
7) On the Features page select Failover Clustering and click Next and then confirm the installation

8) Click add features then click Next
9) Final click on install and wait till completion of installation

10) Now we need to validate the both servers for failover clustering, on the CLUSTER_1 and CLUSTER_2 server open Server Manager, click Tools, and then click Failover Cluster Manager…

11) Right click On Failover Cluster Manager, click Validate Configuration…

12) In the Validate a Configuration Wizard interface, click Next

13) On the Select Servers or a cluster interface, Search and add both Server witch you want to validate, in this scenario i have added my both CLUSTER_1 & CLUSTER_2 Servers and then click Next


14) On the Testing options interface, click Run all tests (recommended) and then click Next…

15) On the Confirmation interface, click Next…

16) This process might take up to 5 – 10 minutes… so please wait till completion and then click Finish....


17) Once Validation completes without any errors, you will automatically be thrown into the Create Cluster Wizard. Walk through this wizard as shown below to create your basic cluster click Next

18) In this screen you will choose a name for your cluster and pick an IP address that will be associated with this name in DNS. This name is just the name used to manage your cluster – this is NOT the name that your clients will use to connect to the clustered resource(s) you will eventually create. Once you create this access point a new computer object will be created in AD with this name and a DNS A record will be created with this name and IP address
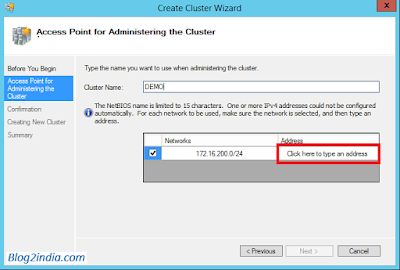
19) Under Address, type 172.16.200.65, and then click Next.

20) In the Confirmation box, verify the information, and then click Next…

21) On the Summary interface, click Finish…

22) Next, right-click DEMO.BLOG2INDIA.COM, select More Actions, and then click Configure Cluster Quorum Settings…
23) Click Next

24) On the Select Quorum Configuration Option interface, click Advanced quorum configuration, and then click Next…

25) On the Select Voting Configuration interface,Do not make any changes, and then click Next…

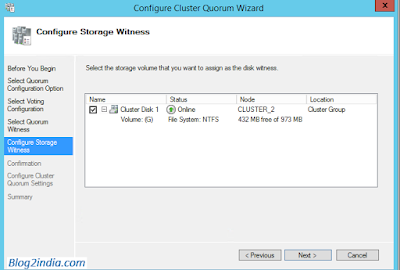
26) On the Select Quorum Witness interface, select Configure a disk witness and then click Next…

27) On the Configure Storage Witness interface, select Cluster Disk 1, and then click Next…
28) Click Next

** we have succesfully tested the failover scenarios .


You now have a basic 2-node cluster and are ready to move on to the next step…creating your cluster resources. I will be publishing a series of articles on how to cluster different resources Like:
- Configure SMB Share
- Install and configure File Server role
- Test both Server one by one
- Verify that you can access the location and create a any text document inside this folder or not …
Related Topic: Different between windows clustering and network load balancing
Tags
Clustering